Under-Sink Organization Ideas: 9 Ways to Tame the Chaos
The cabinet under your sink is where cleaning supplies go to disappear. Pipes in the middle, dark corners, mystery bottles — it’s the most awkward space in your home.
These 9 under-sink organization ideas work for kitchen and bathroom sinks alike. No plumbing skills required.
1. Start With a Complete Pull-Out
Remove everything. Every bottle, sponge, bag, and mystery item.
- Toss: empty bottles, dried-up sponges, products you never use
- Consolidate: three half-empty bottles of the same cleaner become one
- Wipe down the cabinet floor (it’s probably sticky)
You’ll likely remove 30-40% of what’s in there. That’s free space you already had.
2. Add a Tension Rod
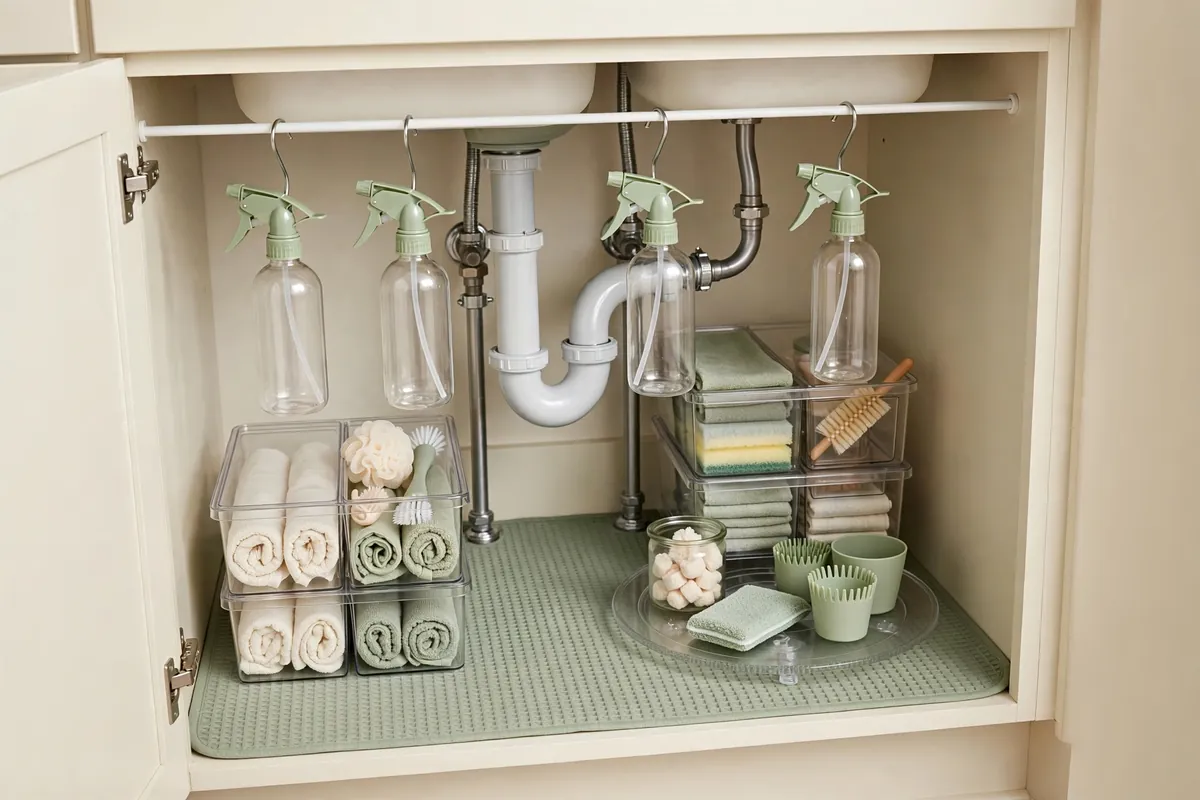
This is the #1 under-sink hack for a reason. A simple spring-loaded tension rod across the cabinet gives you:
- A place to hang spray bottles by their triggers (no more digging)
- Room underneath for bins and larger items
- Zero drilling, zero damage, under $5
Measure your cabinet width first — most kitchen cabinets fit a 16-28 inch rod.
3. Use Stackable Bins
The pipes eat up vertical space, but stackable bins reclaim it. Use two-tier stackable organizers on either side of the pipes:
- Bottom tier: Heavy items — large detergent bottles, bulk supplies
- Top tier: Daily items — dish soap, sponge, hand soap refill
Clear bins let you see everything without pulling them out.
4. Add a Turntable for Deep Cabinets
Deep under-sink cabinets are black holes. A turntable (lazy Susan) means one spin brings the back to the front. Perfect for:
- Cleaning sprays
- Extra sponges and scrubbers
- Small bottles that get lost
5. Hang Things on the Cabinet Door
The inside of the cabinet door is free storage:
- Adhesive hooks for rubber gloves and small brushes
- A narrow wire rack for trash bags or extra sponges
- A small caddy for the items you grab daily
Use damage-free adhesive — no screws needed, renter-friendly.
6. Protect the Cabinet Floor
Under-sink leaks happen. Protect the wood:
- A waterproof cabinet mat (cut to fit around pipes)
- Or a plastic boot tray as a cheap alternative
This one step prevents expensive water damage. Do it even if your pipes look fine.
7. Decant and Downsize
Under-sink space is precious. Don’t waste it on bulky packaging:
- Transfer dish pods into a small sealed container
- Pour bulk cleaners into smaller spray bottles
- Keep only ONE backup of each product (store extras elsewhere)
8. Create Zones
Even in this tiny space, zones help:
- Left side: Dish-related (soap, pods, rinse aid)
- Right side: Cleaning (all-purpose spray, sponges, gloves)
- Door: Daily grabs (trash bags, go-to spray)
- Back: Backups and rarely-used items
9. The 2-Minute Monthly Check
Under-sink cabinets drift back to chaos fast. Once a month:
1. Pull out the bins (30 sec)
2. Toss anything empty or expired (30 sec)
3. Wipe the mat (30 sec)
4. Put everything back in its zone (30 sec)
Under-Sink Shopping List
- ☐ Tension rod (measure first!)
- ☐ Stackable bins × 2
- ☐ Turntable × 1
- ☐ Adhesive hooks × 4
- ☐ Waterproof cabinet mat
- ☐ Small wire rack for door (optional)
Total: $20-35 for a complete under-sink makeover.
Frequently Asked Questions
How do I organize under a sink with pipes in the way?
Work around them: tension rod above the pipes, stackable bins on either side, turntable in front. The pipes divide the space naturally — treat each side as its own zone.
How do I keep under the sink from smelling?
Toss expired products, wipe spills immediately, place an open box of baking soda in the back, and ensure the cabinet mat stays dry. Most smells come from old product residue.
What’s the best way to store trash bags under the sink?
On the cabinet door with adhesive hooks (roll hung through the cardboard tube) or in a narrow door-mounted rack. Never loose at the bottom — they’ll end up soggy.
The under-sink cabinet is small, but organizing it removes a daily frustration. Thirty minutes, twenty dollars, done.